SqlExpress 2008 Remote Access

Enabling Remote TCP/IP Access to SqlExpress 2008

So it happens that SqlExpress is frequently suitable for most small to medium sized app development.  Now it does lack some of the advanced features of course that come in $other$ editions.  Out of the box, however, since it’s intended for use on a single machine, there are issues someone building small distributed, network enabled apps might have to deal with.

  1. Remote Networking is not enabled
  2. SQL Browser service is not typically enabled
  3. Firewall isn’t configured by default to allow connections

No problem.  We’ll simply re-configure it so that you can now connect from remote machines.

Enabling Remote Networking

Relax, this is easy.

  • Start SQL Configuration Manager
  • Expand SQL Server Network Configuration
  • Select the Protocols for (SqlExpress instance) node
  • Set TCP/IP to Enabled
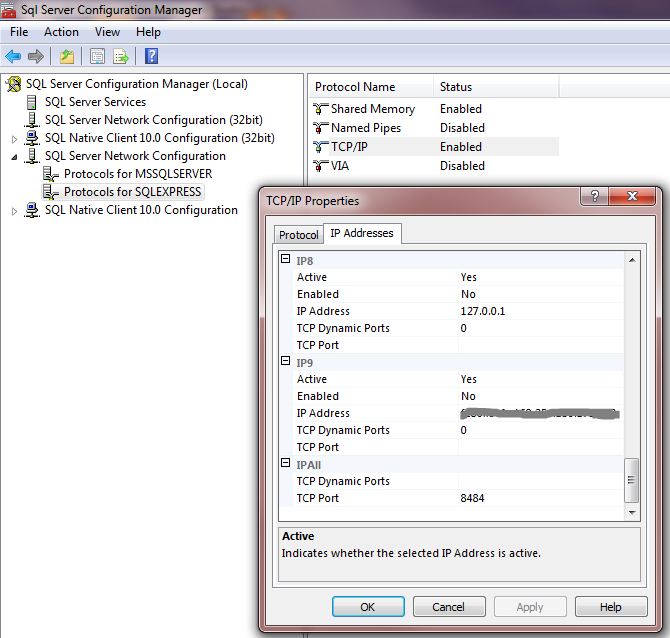
  • RightMouse over the TCP/IP protocol and choose Properties
  • Select the IP Addresses tab
  • Scroll to the bottom of the list for the IPALL settings.
  • Clear out the value in TCP Dynamic Ports so that it is empty
  • Add a port number for TCP Port.   1433 is a decent number to use here unless you have other instances of SQL Server.  I sometimes use 8484 also because it’s easy to remember.
  • Apply these changes.


So, now this Instance of SQL Express allows connections via TCP/IP.  That’s not the whole story…

Configure SQL Server to allow Remote Connection

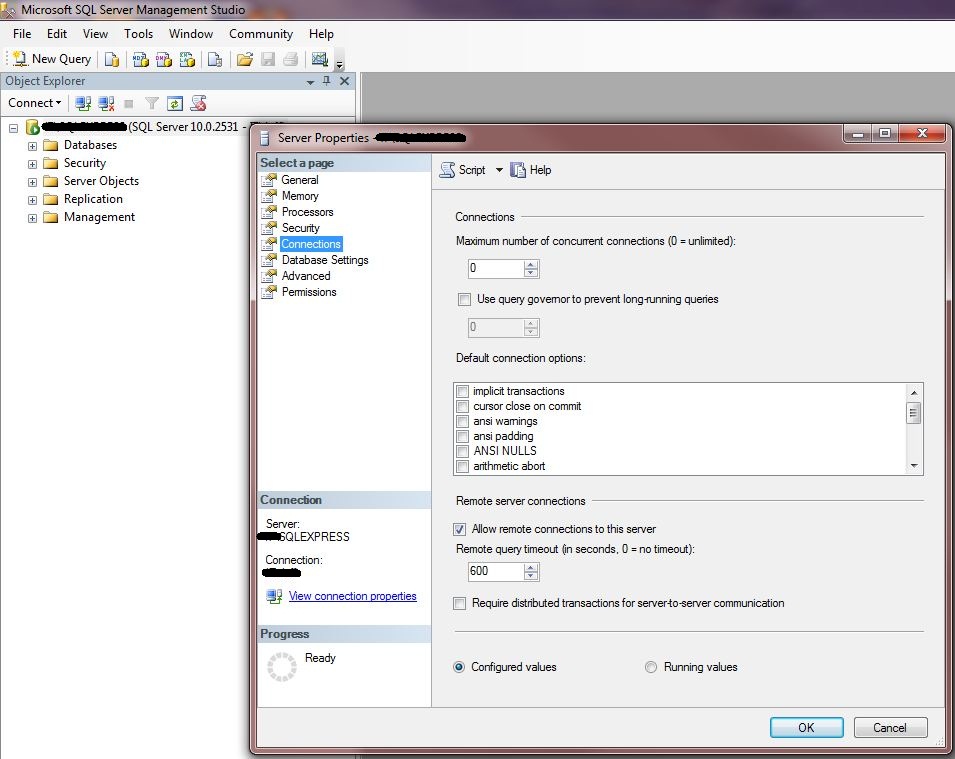
The next step here is to tell SQL Server that remote connections to this instance are Allowed.  We do this simply through SQL Server Management Studio.  So, this brings up an interesting point.  You really really want to have this tool installed on the machine where your SQL Server is running (when you’re doing your development).  There are other ways to accomplish this, but this is the easiest way for those visually inclined.

SSMS_Remote


So, now that Remote connections are allowed, and the TCP/IP port is assigned and enabled.

Ensuring that the SQL Browser Service is Running

The final step is to ensure that the SQL Browser service is configured to start and is running so that the instance can be found remotely.  Maybe someone can tell me whether this is always required, or whether ‘it depends’… :)  If it isn’t always required, what conditions determine that?

Anyway, there’s a problem I’ve encountered several times but not always when installing SQL Express 2008.  Normally the SQL Browser service is not configured to run when only SQL Express is installed.  You may find that in trying to start this service, you get some hokey and completely unhelpful message indicating that it can’t be started when trying to do this from the SQL Server Configuration Manager.

“The service cannot be started, either because it is disabled or because it has no enabled devices associated with it. [0x80070422]”

Well, doh!  Trying to enable it, produces this message.  This is a totally sweet message only Microsoft could come up with.  I’m trying to Start a Service, not connect my iPod.  :)  Anyway, the solution is simple.  Enable the SQL Browser Service using the old fashioned Control Panel “Services” MMC application, just like you would do if you want to enable/disable some other system service.

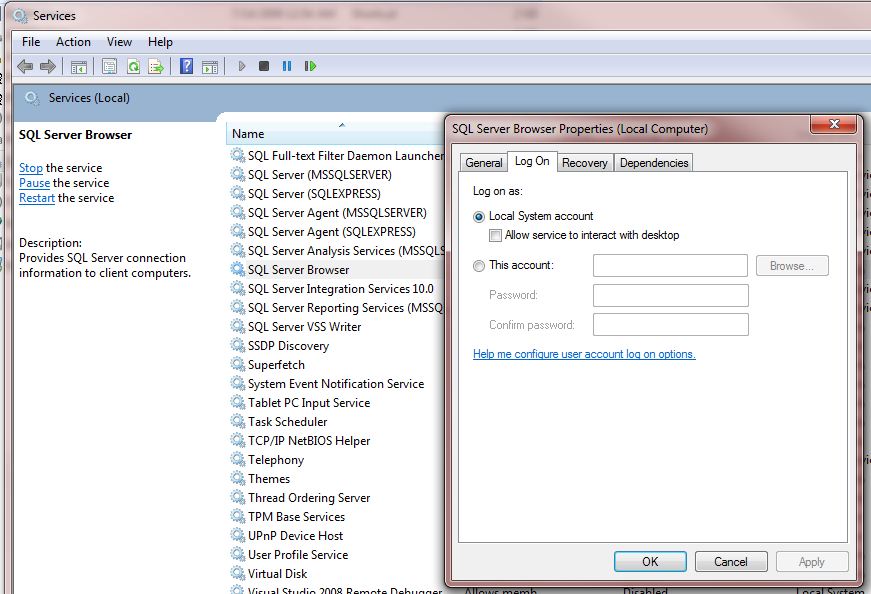
This is OS dependent, but essentially, it’s in the machine’s Control Panel -> Administrative Tools -> Services,  but since it’s an MMC Snapin, it could appear as the Services node in the Computer Management application, or other places.  However you get there, the first thing to do is locate and double click on the “SQL Browser Service”.  Once there, we need to ensure that the Login is set to use Local System and turn off desktop interaction.

Control Panel Services Login Configuration for SQL Browser Service

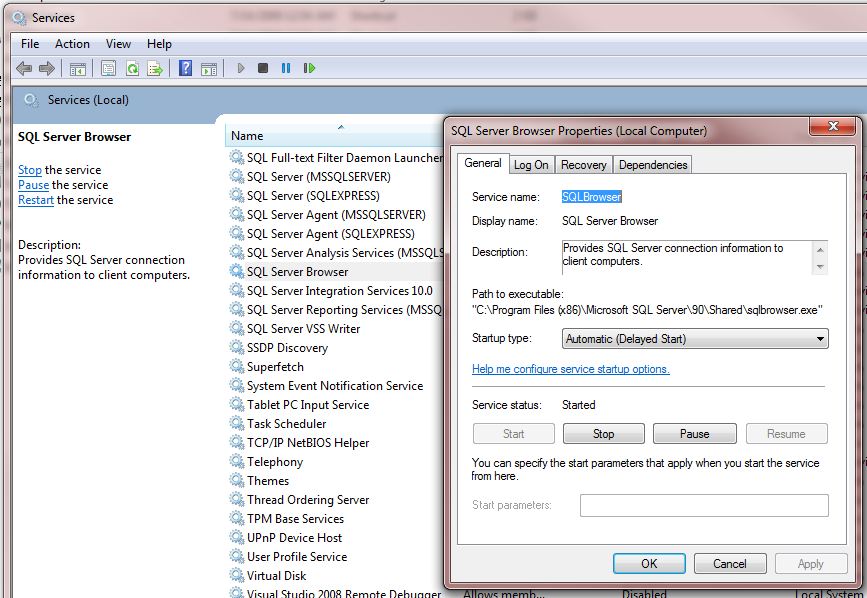
Then we go back to the General Tab in the Properties, change the startup parameters to Automatic (or delayed start) if you like and then Start the Service from here.  Once you do this, you’ll be able to start/stop it from the SQL Configuration Manager utility without getting those bogus messages about not finding your hair drier or some other useless “device”.

Control Panel Services Configuration for SQL Browser Service

Posted in Programming | Comments Off on SqlExpress 2008 Remote Access

WHS PC Restore

WHS PC Restore – Not always so simple?…

So, the Window Home Server automated backup system does really clever block based backup of all the machines on your home network.  The theory is that at a later date, you can easily and quickly restore the exact disk image you backed up, or go pluck a file you deleted several months/years ago that you thought you’d never need again.  It makes it easy to back up your pc, replace the drive with a new blank drive and restore the system to the new drive, or should something go haywire (surely that would never happen on a PC) you can just put everything back as it was when it worked.

Ah.. but maybe it is rocket science after all…

Sometimes a painful reminder isn’t all bad…

So, here I was taking a sweet little Dell D610 laptop running Win7 that I’ve been using for years and removing lots of things that I won’t be needing on it anymore like SQL Server, Visual Studio, Expression Studio, etc., and installing things that it’s future owner will be in desperate need for, like Sims3, etc… :)   I also removed McAfee as I was going to install AVG Microsoft Security Essentials instead.  Well, in attempting to see if I could get Sims3 to run without needing to have the CD in the drive all the time, I did something I never, ever do…  I tried to download a game hack (nocd.exe) patch.  Faster than you can blink, the entire machine was infected by a nasty virus.  It posed as a Virus Scanner, prevented launching any applications and wouldn’t even allow shutdown.   After A quick yank of the network cable and powering it down by holding the power button, I concluded that since I’d run a backup before I started, I’d just reimage the machine and continue.

The lessons here are obvious.  Backup, Backup, Backup,  keep virus scanners in place, don’t browse where you ought not to be browsing and definitely don’t download patches from untrusted sources.

How to Restore a PC using WHS

The PC Restore process should be quite painless… (well that’s the theory anyway).   Unfortunately, it always ends up being a learning experience with the feel of a 3 Stooges episode.  There are some things to keep in mind because they really aren’t well documented.  Each of them will cost time and cause you to start over.  Maybe they’re common sense, but to me they’re a bit arbitrary and some simple WHS Console enhancements could save some headaches and alot of time. WHS is a home media server for non-geeks.

So, there are some things to keep in mind first!

  • The server must not be in the process of doing any backup related operations.  It could decide to start one at any moment while you’re doing this, so it’s a good idea to shut down any other computers on your network you aren’t using for this process.
  • You need to have one other PC running so that you can go into the WHS Backup Console, access a recent backup of the machine you’re restoring and copy the machine’s drivers to a USB thumb drive as you’ll need these when booting off of the WHS RestorePC CD.  This points out that fact that it really helps to have at least 2 home computers on WHS.
  • You must have the network cable plugged into the machine you’re restoring before powering it up.  The network connection may not be made if it is plugged in after you get past the detected devices screen.
  • Always plug the in the thumb drive containing a copy of the special drivers folder from a recent backup and choose the option to install the custom drivers.
  • Reboot the WHS server and let it fully start and settle down before trying to do a restore, again, with all other machines off so that no backups get kicked off.

So, here’s the process.

  1. Reboot your WHS server and make sure that it doesn’t start doing any PC backups.
  2. Copy the device drivers for the computer being restored onto a USB Thumb drive.
    • Connect to the WHS Console
    • Click on Computers & Backup
    • Double-Click on the Computer you want to Restore
    • Find the specific Backup you want to use to reimage the PC
    • Click the “Open…” button near the bottom of the dialog
    • Choose the C: Drive (doesn’t really matter) and click Open.  This will install some drivers and then open an Explorer-like window that lets you browse all the files in the backup. Heed the warning in the little dialog that pops up about not rebooting even if windows says it is needed. 
    • Locate and Copy the Windows Home Server Drivers for Restore directory in the backup.  Drag that entire folder across to the USB  Thumb drive.
  3. Insert the PC Restore Disc for WHS into the drive of the machine you’re restoring.  If you don’t have a restore disc one, you can make one easily by downloading the ISO disk image and burning a restore disk.  The latest version can be downloaded from Microsoft (I have an HP MediaSmart Server Ex-495):  http://go.microsoft.com/fwlink/?LinkID=109282 
  4. Plug in the USB Thumb drive with the drivers
  5. Start the machine and Boot off of the PC Restore CD.  On most Dell computers, F12 does this, but you’ll have to watch carefully early in the startup sequence to see which Function key to press for the device boot menu.
  6. If it boots from the CD as intended, it’ll start a short wizard where you select your Language and proceed.
  7. Next, it will detect the network and disk devices.  This is where you will click the button to install the custom drivers.  It will locate the USB thumb drive you plugged in and find the Windows Home Server Drivers for Restore directory and install these drivers.
  8. Next it will search for your Windows Home Server.  This is the part that kept returning an error saying that it could not locate the Server and gives me options to specify its name or search again.  If the WHS is doing any backups, or hasn’t been rebooted fresh, THIS STEP MAY FAIL.  It took me nearly a half hour to figure that out. The first time, some other PC started a backup and when I stopped that backup, it still wouldn’t find the server.  After rebooting the server and then restarting the restore process it immediately found the server.
  9. Finally, select the drive you want the image restored to and let it rip.  Took me about 50 minutes to fully restore the image on a 100gb disk that was nearly full using 1Gb ethernet network.  Expect that time to at least triple with standard 100Mb ethernet.

Here’s what is insane!  From a network perspective, there’s a huge difference between Not Finding the Server and Not being able to connect to the server backup/restore service.  The former is usually a problem with the Network setup on the PC, the latter is the server being found but rejecting the connection.  So, I spent nearly an hour trying to figure out why the network wasn’t getting started properly on the PC by checking the drivers, etc, when that simply wasn’t the issue at all.  It was just that the backup service on the Server was busy and not accepting connections.

C’mon Microsoft,  make a real effort here.  It matters, especially to people who just want it to do the right thing without becoming an expert.

In Summary

I absolutely LOVE Windows Home Server.  If you use it for nothing else than to drive your printers centrally, backup all your machines automatically, provide central easily accessible folders for storing all your “stuff” that you want to be sure doesn’t get lost, it’s truely a gem.  But add the ability to turn on secure remote access and music streaming so you can listen to your tunes while you’re at work or half way around the world, it’s pretty sweet.  But that’s just the tip of the ‘berg.

About our WHS machine:

As previously mentioned we have an HP MediaSmart Server Ex-495 machine.  It’s a tiny extremely low power machine with a 2ghz dual core processor and 2gb of memory running a stripped down version of Windows Server 2003 (called Windows Home Server).  It uses no keyboard or monitor, automatically shuts off for me at 11pm and back on again at 8am and is so quiet it sits on top of my desk unnoticed.  Note how big it is next to my coffee cup.. 🙂
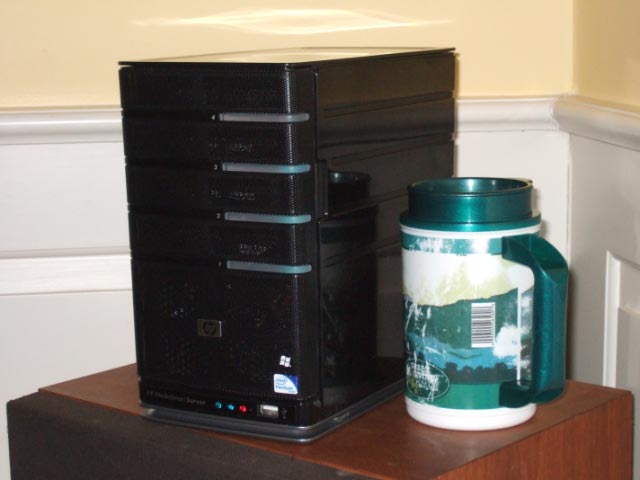
HP MediaSmart Ex495 Windows Home Server

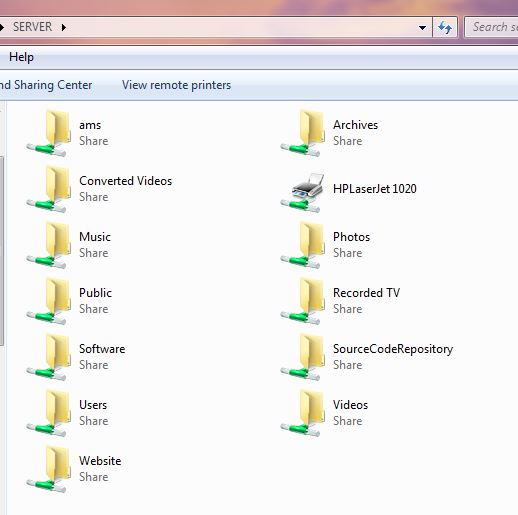
It has 4 hot-swappable drive trays behind a hinged front panel door and 4 USB ports for external drives or printers.  The first drive is the system drive.  The rest of the drives are added to the “storage pool” or optionally as extra non-pooled storage.  Users on networked PCs can easily access a set of shared folders that you can create for organizing stuff you want kept centrally.  Shared folders can be flagged for duplication, meaning that all files within the folder are to be kept duplicated on at least 2 physical hard drives at all times.  This means that if one of the drives dies, you lose nothing and see no actual difference when browsing the shared folders.  Note for the geeks: this is NOT a RAID array, so there IS a period of time that goes by between when you write a file to the share, and when the system actually gets around to writing the alternate copy.  Since you can choose not to duplicate certain shared folders, a dead drive where a non-duplicated folder lives would be lost unless you have a backup.  For the most part you don’t know or care which physical drive anything lives on since you can’t see the individual drives when looking at the server from a connected PC or Mac.  The Following pic shows some of the folders I have on mine and how it looks when browsing the server from the Explorer.
  Note that the next version of Windows Home Server code named VAIL will be based on a stripped down version of Windows Small Business Server 2008 which is 64bit only.  Can’t wait.

Posted in Computer Stuff, Windows Home Server | Leave a comment

Simple Subversion SCM for Private Projects

I recently found myself looking for a well integrated, well supported, simple SCM (Software Configuration Management) system for my private development projects.

The list of SCM systems out there is daunting.  Some are just garbage, some work well, some used to work well but are getting increasingly difficult to find versions compatible with the latest operating systems.

My requirements were really pretty simple, or so I thought…

  • Must not require running any source control server to access stored configurations, although the ability to run an source control server remotely or on another networked system would be a bonus
  • Repositories must be simple to copy, relocate, backup and restore
  • Must support at least basic branching and merging
  • Must support Atomic commits or change sets without manual tagging
  • Must support a high quality integration with Visual Studio 2005, 2008, 2010
  • A migration path from CVS for importing older CVS repositories
  • Simple to install and get running with minimal configuration.

Essentially, I wanted a simple, safe SCM system that works for the individual developer.  I don’t need or care for large team support and didn’t want the admin headaches associated with many of those systems.  It has to “just work” and not get in my way.  I also need to be able to easily grab a zip of the repository, toss it on a laptop and take it with me and be able to work offline.

The solution I chose is SubVersion (SVN).  Here’s how to get it running on a Windows system (x86 or x64) in less than 10 minutes.

Here are the components I’m using:

  • TortioseSVN – Integration with Windows Explorer
  • AnkhSVN – Integration with Visual Studio

With TortoiseSVN, I installed both the x86 and x64 msi packages since they install nicely side by side and allow nearly seamless support for both 32-bit and 64-bit applications.

AnkhSVN supports all versions of Microsoft Visual Studio and like TortoiseSVN, is a virtually zero-configuration install.

Getting Started (Still being cleaned up, so bear with me)

These are simple zero-config installers.

  1. On an x64 system, Install all three to allow both x86 and x64 apps to be svn aware.   On an x86 system, skip the x64 installer. 
    • AnkhSvn-xxxx.msi
    • TortoiseSVN-xxxx-x64-svn.msi
    • TortoiseSVN-xxxx-win32-svn.msi
  2. Reboot in order to have the TortioseSVN fully integrated with the Windows Explorer.
  3. Create a folder for the new Repository.
    • I suggest choosing a repository location near the root of some drive since you’ll use a simple file system URI to access it.  Also suggest that you use a path containing no spaces in the names, although SVN has no trouble with this.  It lets you avoid having to use quotes should you use any SVN commands from the command line in the future.
          ex:  C:\SVN-Repository
  4. Next, we need to turn this newly created folder into a SVN repository.
    • Select the C:\SVN-Repository folder in the explorer and pick the following option on the right mouse context menu:
         RightMouse->TortoiseSVN -> ‘Create Repository Here’   
  5. So, now the folder has the necessary stuff in it to make it a repository.  Next, we’ll browse it with the Repository Browser and create our project areas.
    • With SVN-Repository folder still selected, browse this new repository using this context menu command:
         RightMouse-> TortoiseSVN -> ‘Repo Browser’
  6. The First time you bring up the repository browser you may need to specify the url to the repository you’re going to browse.
    • In the Repo Browser, in our example, make sure the path to our repository points to:  file:///C:/SVN-Repository
  7. In the Repository Browser, select the top node in the Left Pane in the repository and RightMouse->’Create Folder’ to create a top level source folder.  Do this for each individual source tree or separate project you want to maintain.
         ex:  MyMusicApp
  8. Next Step is to prepare your existing source code tree for adding to SVN.  Let’s assume you had your code for the MyMusicApp in a C:\Projects\MyMusicApp directory.  The easiest way to get this into SVN is to perform an IN-PLACE Add & Commit of everything in your existing source code tree.  But first you should remove all the bin, obj and junk folders and files that are automatically created when you build that you don’t want added.  If you miss a few, that’s ok as you can remove them from the repository later.  You can also edit the file exclusion list in the SVN options to specify certain types of files that should not be checked in.  This is a good idea in general.
  9. Here we’re going to put our existing source tree under revision control.  To do this, we have to tell SVN to check out our new empty MyMusicApp project into our existing source directory.  Remember, there’s nothing yet checked into our MyMusicApp repository, so we’re effectively checking out zero files.  But what this step does for us is add the SVN support files needed to attach our working source folder to the MyMusicApp project under revision control.
    • RightMouse->SVN Checkout…  
    • Specify the URL to the repository’s source folder in the dialog:  file:///c:/SVN_Repository/MyMusicApp
    • Also be careful to LOOK at the checkout folder it lists. This should point to C:\Projects\MyMusicApp in our example, since this is where our existing source lives.
    • Again, you’re going to do a fetch of the empty MyMusicApp project into the folder where your existing Source lives. Just ignore the warning about nothing to fetch.  SVN will not overwrite anything, it just connects this working area to the repository we just created.
    • Click ok to do this empty checkout.
  10. Next, go Back into the Repository Browser so that we can place all the existing files under revision control. 
    • To do this, select the project folder MyMusicApp in the Left Pane that we created earlier.
    • RightMouse->’Add Folder’  (not Create folder)  and browse to C:\Projects\MyMusicApp containing existing source you want to add.
    • This has “added” the files as items to be committed, but we need to “Commit” these folders/files to make it happen. You could unselect some of them if you wanted to skip a few.
  11. Back In Explorer, browse to C:\Projects\MyMusicApp and you’ll see that there are some folders with a Blue Plus sign icon.  Select each top level folder that has a BLUE + icon and commit them by using:  RightMouse->’SVN Commit…’    NOTE: Add a comment if you like, and review the files to commit before letting it run.
  12. Fire up Visual Studio.  Go into Tools->Options, and make sure “AnkhSVN” is selected as your source code control provider.  Load up your MyMusicApp project.  You should see that any files that live somewhere in this MyMusicApp folder have a “Checkmark” icon indicating that they are up to date.  If you edit/save one of these, you’ll see it gets a different icon to indicate it has been modified but not checked in.  Pick the menu option: View->’Pending Changes’.  This is where you’ll see each file you change showing up.  Since checkins are atomic and committing a batch of changes increments your current configuration number by 1.   
  13. The rest of the UI in Visual studio is very intuitive.  You can connect Winmerge or your favorite diff/merge tools so they’re launched instead.
Posted in Programming | Leave a comment